Settings Panel
You can find the everything inside your Admin Panel inside Store Locator -> Settings. If you can not see this menu make sure the Redux Framework plugin is installed and activated!
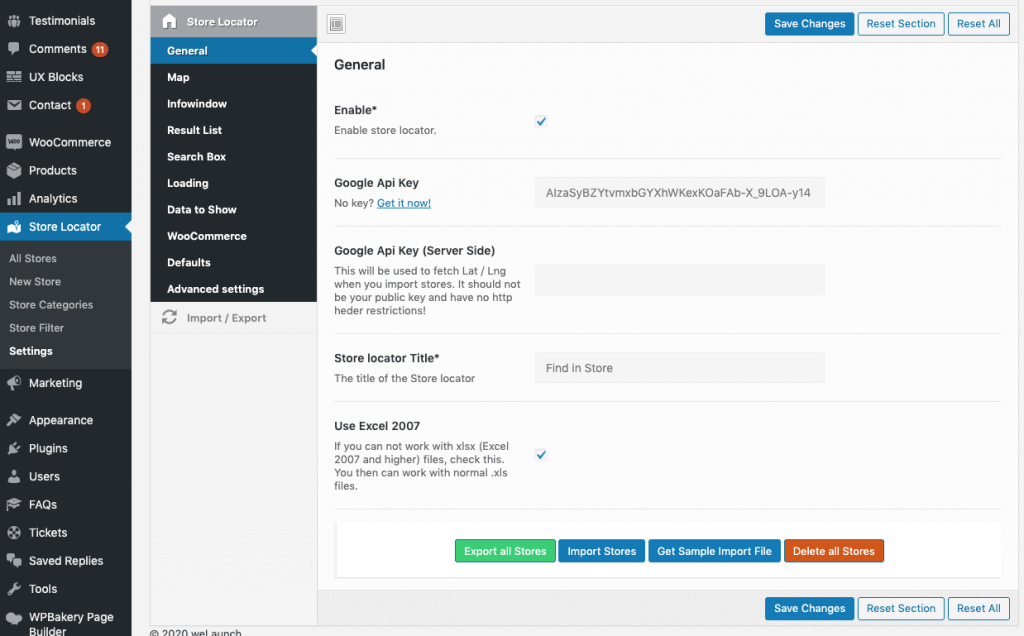
General Settings
In the General settings you have to enable the plugin first. Then you should enter your Google API Key for the frontend (get it here). Also you could set a server side key. This will be used only when importing stores without lat / lng to grab the latitude and longitude data from Google directly.
Below this you can …
- Export all stores
- Import Stores
- Get a sample custom import file (this uses your categories / filter)
- Delete all stores
Map Settings
First you can enable or even disable the map. Then you can set a width and select the distance unit (miles or kilometer). After this you can set some defaults: Latitude, Longitude, Map Type & Map Zoom Level.
For the radius you can set the Radius select steps splitted by comma and set a default radius. You can choose if you want to draw a radius circle and if you want to extend the map if no stores where found.
You should set some default icons for the stores (even if you have set an icon on category or single store level). The logic for icons is the following:
- If a custom icon on single store is set -> take this
- If a custom category icon is set:
- If a store is only in one category -> take this icon
- If a store has multiple icons, the icon only changes when a category has been choosen in frontend
- If no store / category icon is set -> take the default Icon
At the bottom you can style the map as you like via some custom JS stylings. Examples can be taken from https://mapstyle.withgoogle.com or https://snazzymaps.com

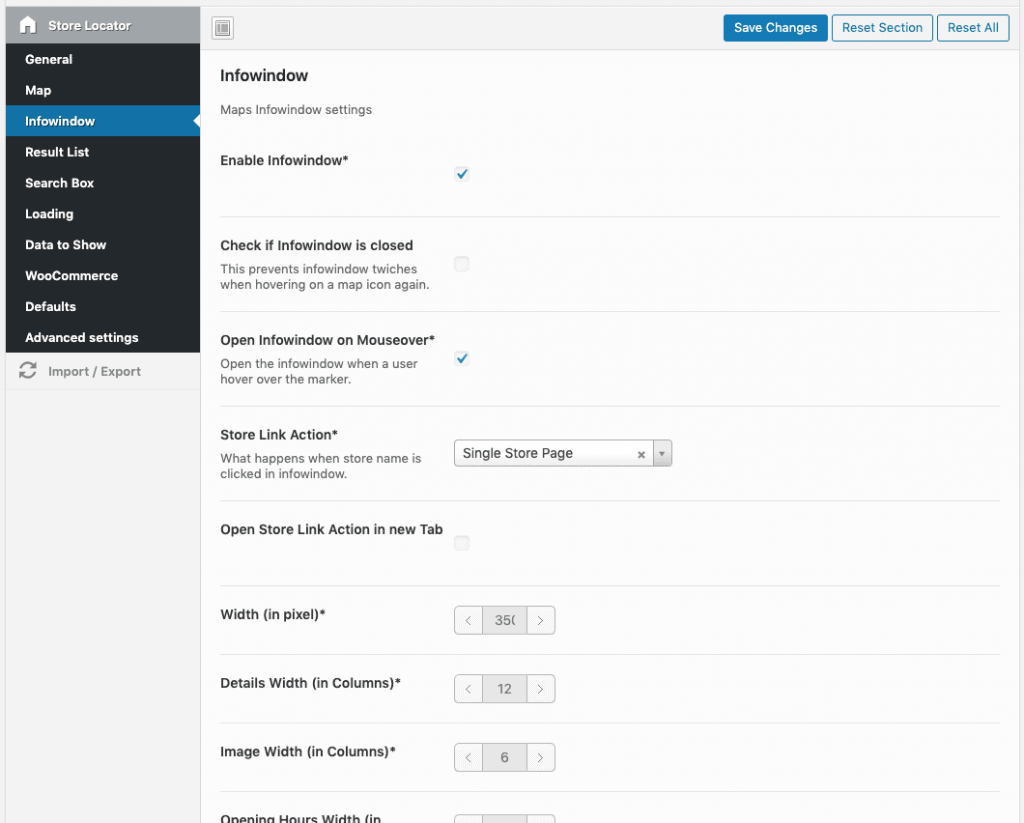
Infowindow Settings
The infowindow (when you click on a store) can be enabled or disabled. While enabled you have the option to set a custom width for the infowindow itself. Then you can specify the column layout for the details, the image and the opening hours.
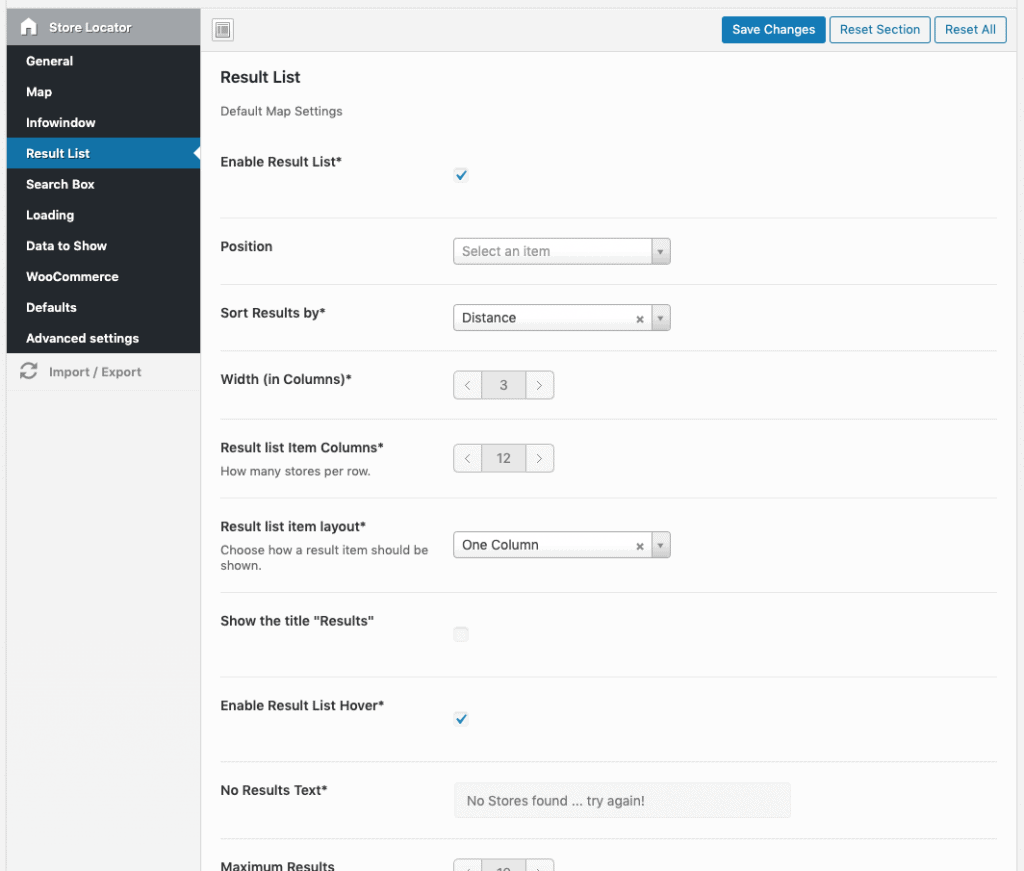
Result List Settings
Enabling the result list will give you the opportunity to choose a position (left / right sidebar, above / below the map). You can choose the result list order, the width and if you want to show the title or not.
Furthermore you can set …
- a “No Results Text”
- Maximum Results
- Store Link Action
- Show Result List Icon
- Show Result List Premium Icon
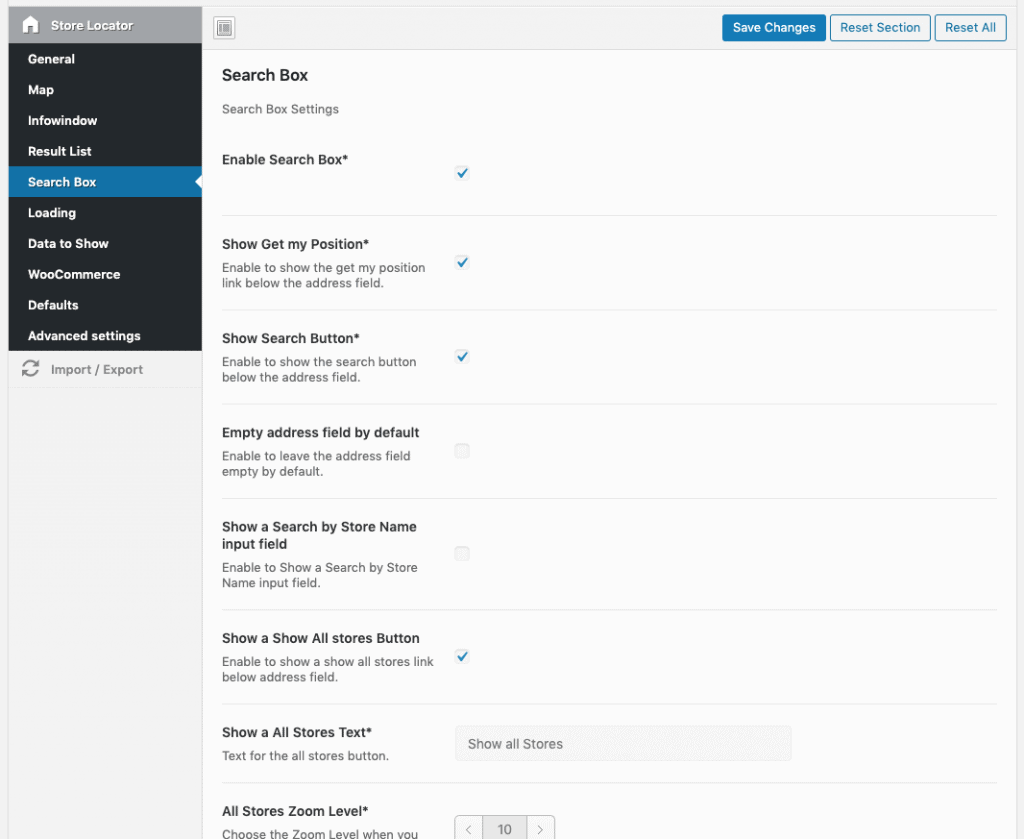
Search Box Settings
In the search box settings you can show the “Get my Position”-Link, show the Search Button, Search Title, Active Filter or Filters in total. Also you can set a default category filter and button text.
Furthermore you can:
- Enable Auto Geolocation
- Save Auto Geolocation in Cookie
- Enable Autocomplete
- Restrict Types
You may restrict results from a Place Autocomplete request to be of a certain type. If for example you want to hide the street from autocomplete search, you have to select the “Regions” - Restrict Autocomplete to a country (2 character ISO-Codes only! You can insert for example us to limit the autocomplete to only search in United States)
- Position
- Width (in Columns)
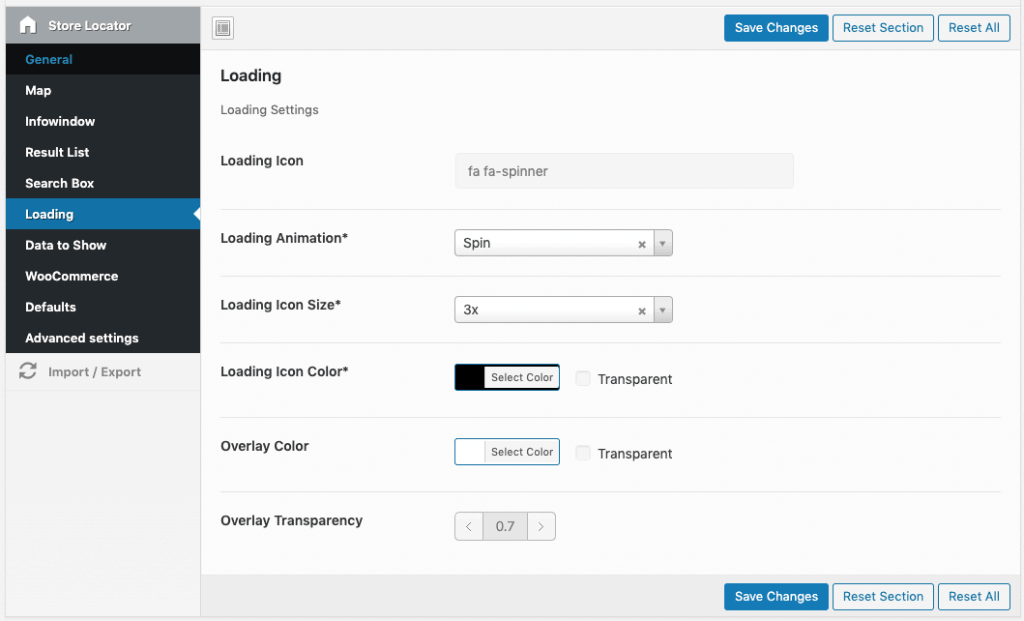
Loading
When stores are being fetched, a loading icon will be displayed. With our plugin you can totally customize the icon. Choose a new icon, color, background color and more.
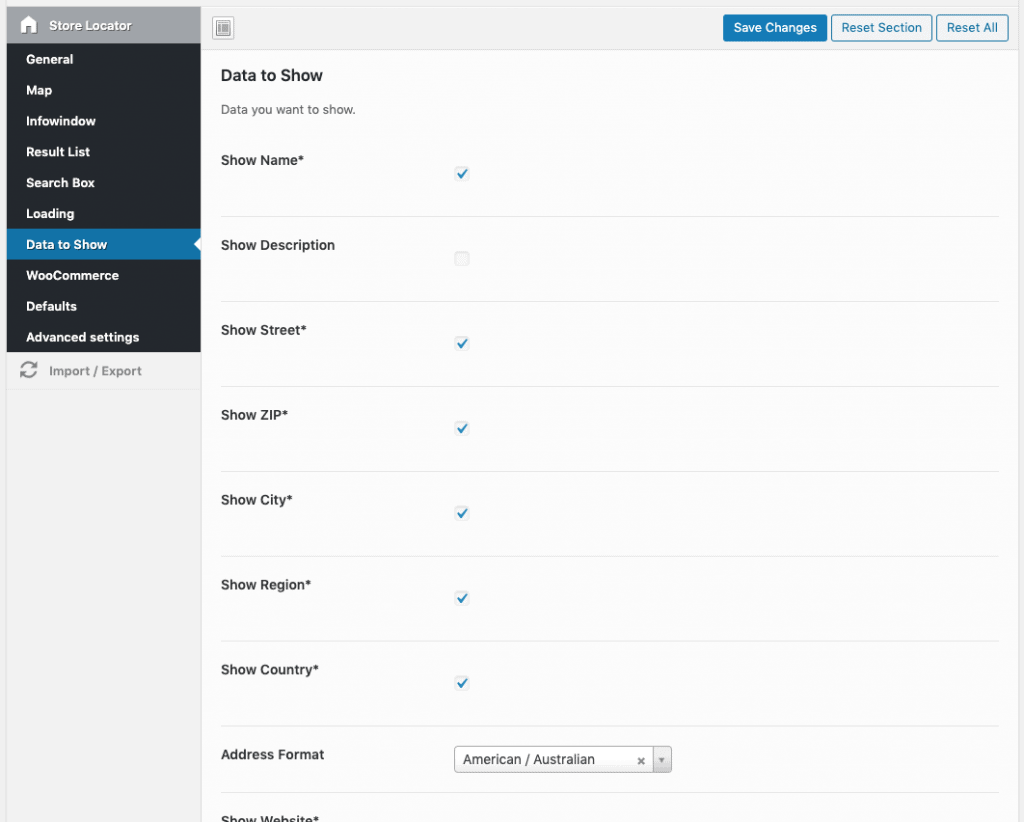
Data to Show
In total you can customize 20 different data to show. In example you can specify if you want to show a store’s name, the description, website, image, opening hours …
You can also enable or disable the call to actions here. These are displayed as button in the single result list.
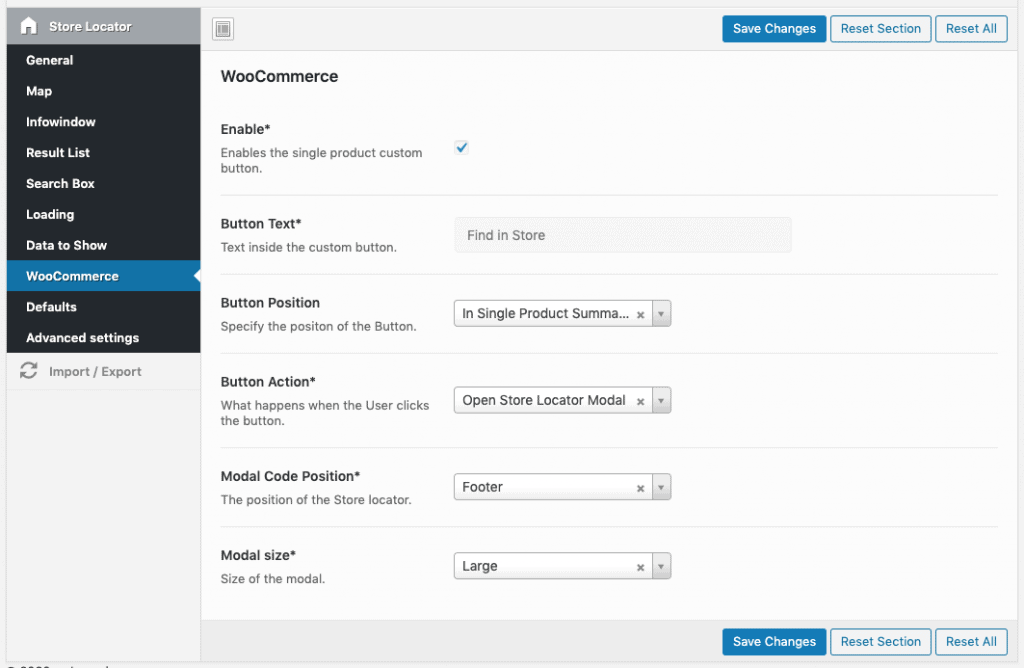
WooCommerce – Store Locator Button
When you have a WooCommerce Shop you can show the store locator button on single product pages. Within the store locator button settings you can choose where the button should show up and how the modal should look like.
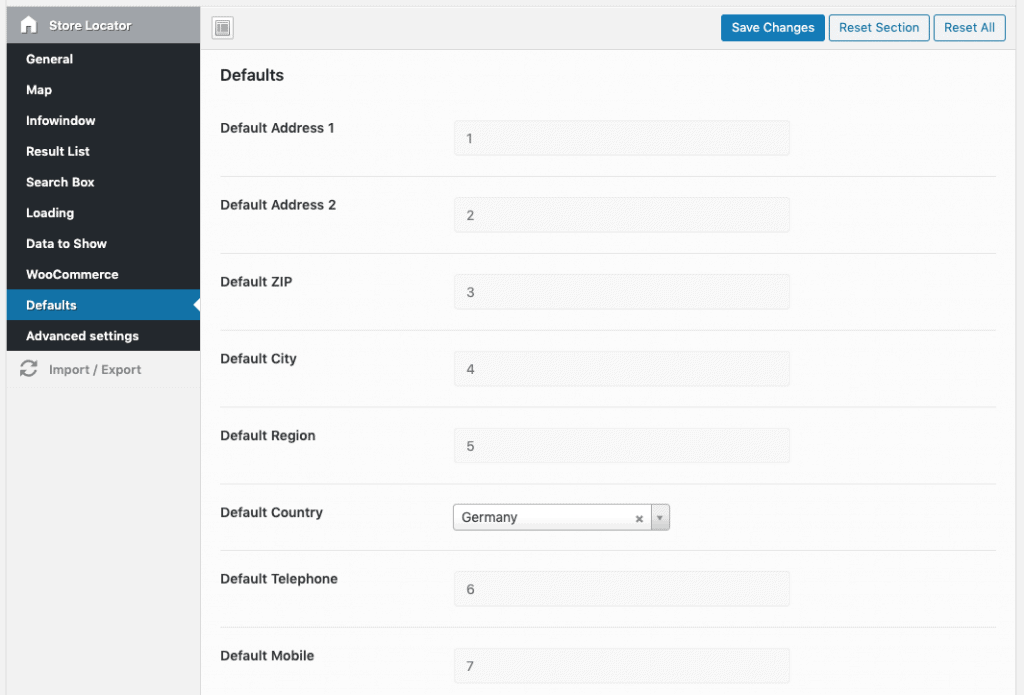
Default Store Values
Setting up default store values helps you to easily create stores, that always have the same data (like a website, country or opening hours). Just set a default value and everytime you manually create a store the defaults are filled out.
Advanced Settings
Here you can add some custom CSS or custom JS. Also, if you have problems with the layout, you can disable Bootstrap here.
Hi, I just installed this plugin and set the results list position to be below the map. However, the results list is actually rendering to the right side of the map, below the filters. This seems like a bug. I specifically need the results list to appear below the map. Please advise.
Please send wp admin login & your codecanyon purchase code to [email protected]
Hi there, I added this plugin to my WordPress site, but for some reason, an error message saying “Geocoder failed due to: REQUEST DENIED” would pop up, from my understand i did enable the geocoder and I’m using the correct API keys in the setting for this plugin, so i have no idea what am i doing wrong, this error message keeps on popping up and the map would not show properly. is it because i did not fill in the API keys(server-side) section? and i have no idea where to find that as well. Please help
Please see this FAQ when you get Geooder failed / Request denied errors.
Hallo Leute, wir verwenden Ihr Plugin. Aber der Lader ist beim Laden nicht sichtbar. Wie ist das möglich?
Wir können den Indikator für das Laden des Ladenlokals auf Ihrer Website sehen: https://imgur.com/a/AgR0wvW
Thank your for your reply. How can I generate an API key for the server side? I just see the field on the plugin settings but I don’t know how can obtain it.
It is just a simple new google key that you can generate from google API console.
I am uploading an excel with data from our stores (I am uploading an excel with the data from our stores, before downloading the sample file). When I do a search, the stores don’t appear because “lat” and “lng” fields are empty. These fields are essential for the location? is not valid only with the address?
No you need to provide either lat / lng in the import file OR set a server side key in plugin settings and let lat / lng empty in the import file.
Hello, I just install your plugin and I have a little problem. When I click on the website text on the details of the store, a wew page opens within my own main page. I would like open the store page in another window, is it possible?
Suddenly it is working correctly, I have overwritten the store data and website is already opened on a separate page. Thank you.
Yes in plugin settings you can define to open the store page in another window.
Hello,
is it possible to sort the result list by their postal code?
Thank you in advance for your reply
Alexis
No sorry that is not possible right now, but you can contact our customization service at [email protected] to add this feature.
Wie können wir die Öffnungszeiten als 12-Stunden AM/PM statt 24-Stunden anzeigen?
Es ist ein freies Textfeld, in das Sie einen beliebigen Text eingeben können.
Hello,
The error message while uploading the store is “No Store Name in line: 1″….up to the last row
even though the file has a store name column. Kindly assist.
Bitte verwenden Sie die offizielle Shop-Importvorlage, die Sie in den Plugin-Einstellungen erstellen können.
Gibt es eine Möglichkeit, auf der rechten Seite nach dem Vorschaubild eine Schaltfläche hinzuzufügen?
Nur über Anpassungen
Ist es möglich, dass der Kunde seinen genauen Standort auf der Karte mit dem Picker auswählen kann?
Ja, wir verwenden HTML5-Geolocation, um den aktuellen Standort des Nutzers zu ermitteln.
No, that turns on/off the opening hours, does not change the o’clock text
Hi. Is it possible to customize the category taxonomy for individual store landing pages?
Example:
Right now out of the box it’s https://sandlersysdev2.wpengine.com/store/sales-growth-associates-llc/
vs. what we’d like: https://sandlersysdev2.wpengine.com/training-centers/sales-growth-associates-llc/
Thank you!
How can I remove the “O’Clock” from opening hours side panel?
In plugin settings data to show you can change / remove the opening hours o’clock text.
This is just for the store popup on the map, not the results side panel. I have the same issue with times showing as “08:00 – 17:30 o’Clock” in the results side panel. Is there a way to change it?
Hi!
I bought the WordPress Store Locator plugin and I’m getting some issues:
1. Much white space between elements
I already did what is in this FAQ, but it doesn’t work
https://demos.welaunch.io/wordpress-store-locator/docs/faq/much-white-space-between-elements/
2. Max Height Result List
I followed the FAQ and it didn’t work
https://demos.welaunch.io/wordpress-store-locator/docs/faq/max-height-result-list/
3. The plugin only works with “Use Output Buffering” marked. Is it right?
My theme is Unicon with WPBakery Visual Composer (http://unicon.minti-themes.com/)
4. The result list is not showing all the content, it is hidding part of them and not breaking lines.
5. The appearance is different from the demo. How can I get it more likely.
You can check out my website with the Store Locator on https://newsite.ekobe.ind.br/onde-encontrar/
Hi there,
Is there a way to show an incrementing number on each map marker such that the number matches a number in the results list? I was able to get an incrementing number to show in the results list using this CSS but not in the map:
.store_locator_result_list_item {
counter-increment: number;
}
.store_locator_result_list_item:before {
content: counter(number)” “;
width: 25px;
display: block;
position: absolute;
top: 20px;
height: 25px;
z-index: 2;
left: 25px;
color: white;
}
Hi there,
could you list which APIs one has to activate? As far as I can see: Geocoding API (imports, I guess), Maps JavaScript API, Places API. Anything else? I think that info would be great in the the general settings paragraph.
Cheers
Floutsch
Theses 3 services are the only ones you need to enable 😉
Thanks for the reply. Great 🙂 I’ll follow-up with more questions, sorry:
– I want to show filters for range but we don’t use taxonomies. Is there a way to hide the category dropdown or should I just use CSS?
– I can switch on and off display of opening hours. If I want those only in the results not in the infowindow (or other way round), can I set this?
– What do the “width in columns” values refer to? Bootstrap columns?
Hi there!
I’m wondering if it’s possible to display all store pins on default and make them disappear as someone is filtering them or using the search?
Hi,
I purchased the plugin and installed it on my demo website. It is installed perfectly. Everything works perfect in the backend but the issue is that when i try to view any of the store, a 404 page is returned. Could you please guide what could be the reason.
Sample Store Pages:
https://www.taifalemarat.com/store/ajman-city-center/
https://www.taifalemarat.com/store/yas-mall/
You should save the permalinks once in settings > permalinks.
Hello, before I buy this plugin, I need to know if it’s possible to do the following: We have crews across the US and we also have customers with store locations across the US. Can I use this plugin to show how many of those crews are based around a specific customer’s store/location? For example, our customer can select a store in New York City and then see all of the service crews around that store’s location. Also, will the plugin show the distance/miles by road/highway from that crew’s location to that store’s location? Can I do this using your plugin? Thanks in advance!
-Jonathan
I would like one specific store to show up for every search, regardless of the zip code entry. How would someone do this?
Hi Nick,
this is not possible sorry.
Hello!
One final question – how do I build the plugin so that one specific store shows up in every search?
Thank you,
Jack
Hello again,
The last step in this project is to build the plugin to show one specific store anytime. I’m not sure how to do this easily. What could be one suggestion that might work?
Thanks!
Jack
That is not possible …
Great! Thank you for your quick support.
One last question – is there a CSS stylesheet or place that I can see the classes you used (specifically for the buttons) to style the plugin? I have a theme for the site that must match your plugin.
Thank you!
Jack
You can use Google Chrome inspector to get to know the different CSS classes used 😉
Great, thank you!
Hello!
I’m building a search for a specific kind of financial advisor. I’m hoping to style the plugin to match your demo of “Search for Store” (e.g. map & results load in a different window, the search bar is the only visible part at the beginning).
What settings need to be activated for this to happen? If we can get this finished I can guarantee a 5-star review.
Thank you!
Best,
Jack
Hi there,
you only need to add the shortcode to your page as described in our documentation 😉
Hi !
I have purchased this plugin and installed. but it’s not working properly.
We don’t use WooCommerce so i am wondering if this plugin could work properly without install woocommerce.
Thanks,
James
Sorry but what is not working properly?