Mise en place de PayPal
Nous allons d’abord utiliser le bac à sable de PayPal pour tester la fonctionnalité. Vous avez donc besoin d’un compte développeur et de votre identité PayPal. Pour obtenir un compte de développeur, il vous suffit de vous connecter avec votre identifiant PayPal habituel ici : https://developer.paypal.com. Allez ensuite sur la page des comptes et créez un compte d’entreprise et un compte d’acheteur.L’étape suivante consiste à obtenir votre identité PayPal. Allez-y et connectez-vous avec le compte Sandbox Business que vous venez de créer à l’adresse suivante : https://www.bac à sable.paypal.com ou visitez directement ce lien : https://bac à sable.paypal.com/businessmanage/preferences/website. Assurez-vous de cocher toutes les options requises dans ce Panel :
- Activer le retour automatique (ne pas oublier d’y mettre une URL)!)
- Activer le transfert des données de paiement. Vous verrez alors votre identité ci-dessous.
- Sauvegarde!
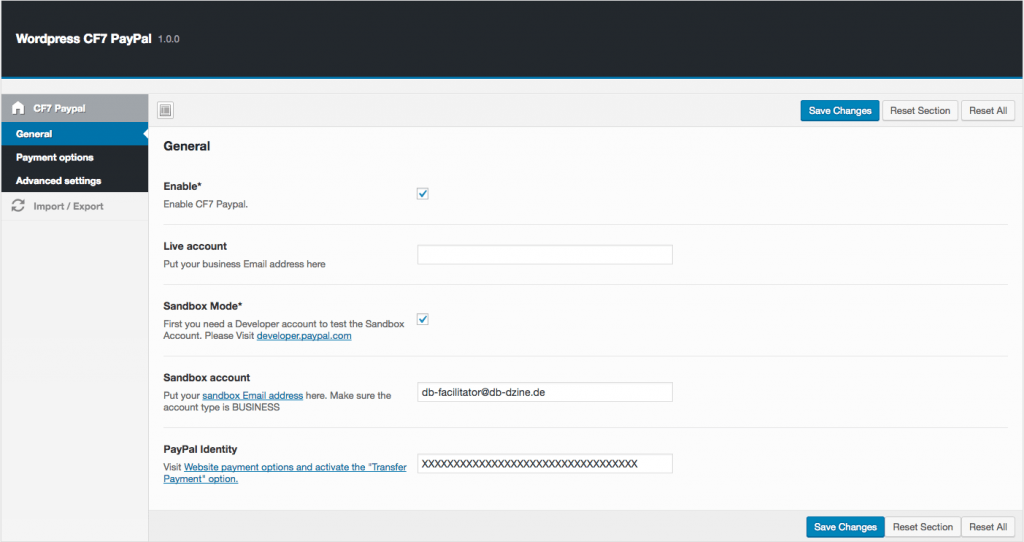
Paramètres généraux du plugin
Une fois que Paypal est installé, retournez dans les paramètres du plugin et :
- Activer le plugin
- Activer le mode bac à sable
- Entrez dans votre compte Sandbox (l’entreprise, pas l’acheteur)
- Entrez votre identité PayPal
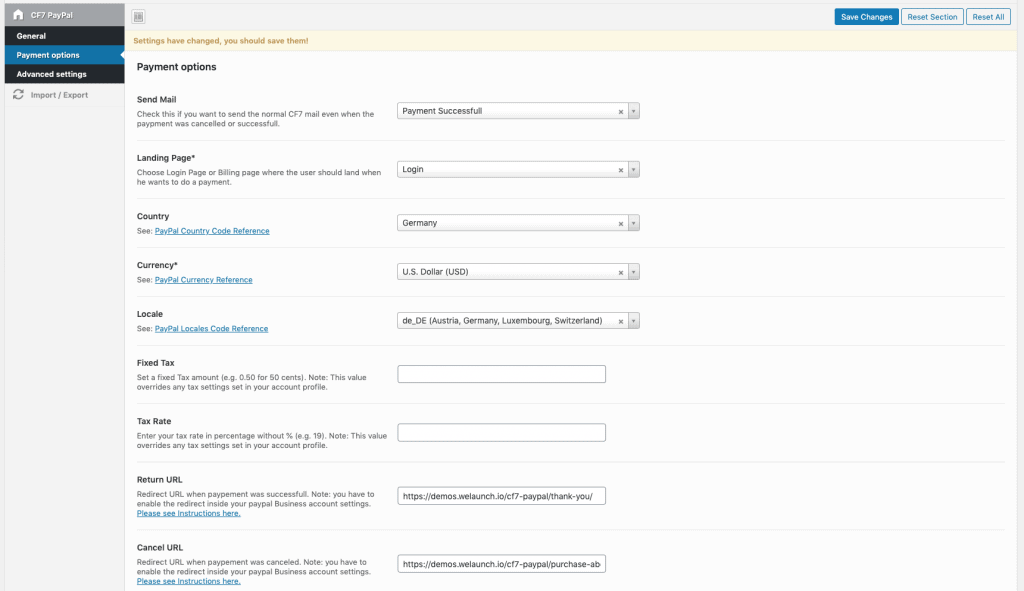
Option de paiement PayPal
Nous devons maintenant configurer les options de paiement dans l’onglet “2èmes paramètres” (voir la capture d’écran ci-dessous). Ici, vous devez …
- Définissez votre pays
- Définissez votre devise
- Définissez votre lieu de travail
- Définissez votre taxe fixe
- Fixez votre taux d’imposition
- Définissez votre URL de retourAssurez-vous d’avoir activé la redirection dans votre compte PayPal Business
- Définissez votre URL d’annulationAssurez-vous d’avoir activé la redirection dans votre compte PayPal Business
Créer le formulaire de contact
Après avoir configuré les paramètres du plugin, nous pouvons créer notre premier formulaire de contact. Disons tout d’abord que PayPal propose un grand nombre de champs de saisie, qui peuvent être ajoutés à votre formulaire de contact. Une référence complète peut être trouvée ici. Mais nous n’aborderons que les plus importants d’entre eux.
Détails pour les clients
Si vous ne souhaitez pas utiliser les informations client du compte PayPal de l’acheteur, vous pouvez les remplacer par des champs personnalisés. Par exemple, le prénom, le nom ou l’adresse. Voir l’exemple suivant :
Votre contact
Votre prénom* [text* first_name]
Votre courriel* [text* email]
Votre adresse* [text* address]
Les produits que vous souhaitez vendre
Ensuite, nous allons configurer le(s) produit(s) que nous voulons vendre. Comme nous utilisons la fonctionnalité PayPal Cart, nous pouvons configurer un nombre illimité d’articles. Un poste est toujours composé des champs suivants. XX correspond toujours à l’identifiant actuel de votre produit (e.g. 1 ou 2).
- Nom de l’article (nom_de_l’article_XX) | Exemple :
- Numéro d’article / SKU (item_number_XX) | Exemple :
- Montant de l’article / Prix (montant_XX) | Exemple :
- Quantité de l’article (quantité_XX) | Exemple :
Votre commande
Quantité* [number quantity_1 min:1 class:fw max:10 “1”]
Le bouton PayPal
Après avoir configuré le “Données” nous devons créer les boutons. Notre plugin est le seul à prendre en charge les deux types de boutons : soit le bouton normal “envoyer uniquement le formulaire”-(soumettre) ou le bouton “Payer avec PayPal”-Bouton (paypal). Dans notre exemple, nous ajouterons les deux boutons. Le bouton d’envoi normal doit être clair, nous sautons donc cette étape. Le bouton PayPal se trouve dans la barre des tags (voir la capture d’écran ci-dessous).
- Label (texte du bouton) | Exemple : “Payer avec PayPal”
- Paiement réussi URL de redirection (qui remplace l’URL globale) | Exemple : “https://www.votredomaine.com/custom-success-url/”
- Paypment cancelled Redirect URL (qui remplace l’URL globale) | Exemple : “https://www.votredomaine.com/custom-cancel-url/”
- Attribut de classe | Exemple : “bouton paypal”

Votre contact
Votre prénom* [text* first_name]
Votre courriel* [text* email]
Votre adresse* [text* address]
Quantité* [number quantity_1 min:1 class:fw max:10 “1”]
[paypal class:fw “Pay with Paypal”][submit class:fw “Or send individual Request”]Note : N’oubliez pas d’insérer les champs également dans l’onglet Courrier! Dans le cas contraire, vous ne recevrez pas les données par courrier!Faire un test
Testons si le formulaire de contact fonctionne :
- Créer une nouvelle page
- Insérer le Shortcode de Contact Form 7 (dans notre cas il s’agit de : ])
- Visiter la page
- Saisissez vos données
- Cliquez sur le bouton Payer avec PayPal
- Vous devriez être redirigé vers PayPal
- Assurez-vous d’être dans le bac à sable.paypal.com
- Connectez-vous avec votre compte Sandbox Buyer
- Payer la facture
- Vous devriez être redirigé vers votre page de succès.
- En outre, l’administrateur du blog recevra un courrier électronique si la transaction a été effectuée avec succès!